3 photos
1949' Jaguar Xk120 Alloy Xk120
Report This Ad!Rate This!Bookmark This
£290,000Published 12 November 2019ID: wbWdrp
Expired
6 years, 7 months ago
6 years, 7 months ago
Information from the owner
Age: 70 years
Exterior color: Blue
Exterior: Tonneau Cover
Seller's comments about 1949' Jaguar Xk120 Alloy Xk120
Jaguar XK120 Alloy Roadster, RHD # 660046
Over View:
This document is written as a continuation of the file “XK120 Alloy History” and is to document the full restoration of 660046, commencing from the time of its original purchase by Barrie Angliss in 2001.
A file of historical documentation and receipts are available in digital form, together with a collection of photographs at various stages of the restoration.
All numbers are certified correct and matching by Jaguar Heritage (certificate available):
Chassis # 660046
Engine #: W 1133-7
Body #: F1153
Gearbox #: JH1180
Condition of the car as purchased:
During the restoration process initiated by Brylaw’s in the late 1970’s the bodywork was partly restored with portions of the woodwork, alloy and steel replaced and the car was painted dark blue. The original (and correct) engine and drive train were claimed to have been completely overhauled by Brylaw’s, as were the suspension, steering and brakes.
While in the ownership of John Bray (from about 1979 until 2001) very little was actually done to the car except for some detailed work. But important work had been accomplished in sourcing components that are now obsolete and almost impossible to find.
Barrie Angliss was advised of the existence of 660046 through the Jaguar Club of Canberra and he purchased the car from John Bray in 2001.
Barrie was a New Zealand importer of classic cars, was co-owner of the world famous coach building company Tempero Coach & Motor Co. Ltd, and later spent a number of years with RM Auctions in the USA.
At the time of purchase the chassis and body seemed to be in good condition and the car was substantially complete, but it was obvious that this would be a major restoration project.
Restoration Research:
660046 was then shipped to New Zealand for restoration. When it arrived in Auckland NZ, Angliss and the restoration team at Henderson Vintage Car Restoration spent some months researching the history and provenance of the car. The result convinced them that the car was worthy of a full frame off restoration to the highest possible standards.
They undertook a full inspection of the car, including careful measurements of each panel, checking for alignment, fit and overall integrity. The next step was to completely strip off all the old 1970’s paint to reveal what was underneath and to remove the engine and gearbox assembly for stripping and checking.
Body:
For the whole of its life the car had been in dry Australian near-desert conditions, similar to Arizona’s climate, and so had suffered virtually zero deterioration from rust or other corrosion. Much work had been done while in the ownership of Brylaws in the 1970’s - legend has it that they spent in the vicinity of A$40,000 on the car, which was a massive amount of money in the 70’s. The car is in fact quite famous in Australian circles and is known as the “Brylaw’s Black Hole”, referring to the amount of money that was poured into the car.
However, the company that started the restoration at that time were not working to modern standards and the quality of the bodywork and panels would not be accepted in current concours circles.
Accordingly, Henderson Vintage Car Restorations commenced a comprehensive rebuild, starting with the removal of all dubious woodwork and aluminium.
The tradesmen who worked on the car were among the highest skilled coach building artisans in the world. Using the old fashioned methods as employed by Jaguar when the car was originally built, they took fresh sheets of aluminium and used English wheeling machines, folders and welders to construct new panels wherever required.
As a starting point a complete new set of sills, hinge pillars and shut pillars were fabricated from wood and steel to give a perfect aperture for the doors and a guaranteed correct center section for the car to be built around. The windshield top tonneau panel was then checked and found to be out of alignment, so a new wood frame was constructed together with a new aluminium top panel. From there the coach builders moved on to the critical forward sections of the car.
The aluminium in the front guards was found to be very fatigued and thin and were impossible to work with. In addition the sides were somewhat bulbous instead of being completely flat. So in order to make a perfect job a complete new pair of front guards were fabricated, from the bulkhead to the bumpers, including the headlamp pods.
The bonnet was also inspected at this time and found to be in similar condition. So a complete new bonnet was fabricated, using the original as a template, including a new front section to perfectly house the car’s original double fluted grille.
The next stage was to remove the rear guards, tonneau panels and boot lid. The wooden frames were found to be badly deteriorated so a complete new set of frames were made using Jaguar’s original method of laminating several thin layers of wood to the correct curvature. New aluminium was then used to re-skin the tonneau panel and boot lid.
The rear guards and spats were in the same condition and so were discarded and a completely new set manufactured. Finally, a new pair of doors were made to perfectly fit the door apertures.
The end result can be seen from the photographs. The new owner can see a completely fresh and perfect body, built by skilled craftsmen, all in bare aluminium, without any sort of body filler being used before the commencement of painting.
Chassis:
The work on the body as listed above was accomplished while it was mounted on the chassis. Note that the construction of the alloy cars was quite different from that of the steel cars, where the body can be lifted off in one piece (with appropriate bracing). An alloy car has its body hand crafted and installed on the chassis frame in sections, each of which must be perfectly aligned on the chassis before progressing to the next stage. As such, each Alloy car was slightly different and panels are not interchangeable between cars.
Referring to the photographs of the restoration, the body can be seen complete and mounted on the chassis. At that stage the body was lifted off the chassis in sections and the chassis was laid bare.
All remaining components were then stripped off the chassis. This included the suspension, steering, brakes and all piping and wiring.
Upon inspection the chassis was found to be in excellent condition with no signs of rust or damage of any kind, as would be expected from a life in Australia’s dry desert climate. It had been painted in black by Brylaw’s during their 1970s restoration and this has faded but it had done its job in preserving the frame from deteriorating.
The bare chassis was sent to a specialist for media blasting, inside and out. Sand blasting was ruled out because of the potential abrasion of the steel, so the relatively new technique of blasting with ground walnut shells was employed. After cleaning the chassis was then immediately given a coat of etch primer.
On return to the restoration shop it was carefully inspected, any minor defects were rectified and it was repainted in gloss black two-pack paint. The inside of the chassis rails were liberally coated in “Fishoilene” a traditional rust preventative.
Engine & Mechanical Parts:
While the body and chassis were being restored, work was started on the mechanical side of the car.
The car was fitted with its original engine and it was correct and complete, including the original “stud-free” cylinder head, high-pot carburettors, inlet and exhaust manifolds, alloy cooling fan, and sump with its integral oil level sensor.
Brylaw’s had reconditioned the engine by reboring the block, fitting new pistons, grinding the crankshaft and fitting new bearings and so on.
However, this was done some 25 years ago and it was doubtful whether the engine would have retained its integrity over the years. Accordingly, the engine and gearbox were removed and sent to a leading Jaguar specialist for stripping and checking. This proved to be a good step because, although the bores and crankshaft were in perfect condition, there were definite signs of ageing, specifically the piston rings and timing chain adjusters losing their tension.
So the engine was brought back up to perfect standards, with the crankshaft polished, the bores honed, new piston rings, bearings, tensioners and so on fitted. The cylinder head was dismantled and checked, the valves re-ground and new springs fitted. The whole internal assembly and flywheel was then balanced and the engine re-assembled.
While this work was progressing, the carburettors, distributor and electrical components were all overhauled. The dashboard instruments were all restored by a specialist instrument maker.
All the alloy on the engine was cleaned and sent to a specialist polishing house and given a high level of polish. This included the carburettors, inlet manifold, cam covers, breather housing and so on.
The exhaust manifolds were sent to a specialist and were refinished with vitreous enamel to the highest standards, as was originally done by Jaguar. The end results can be seen from the photograph of the engine before re-installing in the chassis.
The gearbox was dismantled and found to be in excellent condition, so it was re-assembled with new bearings, synchro rings and seals. A new clutch friction and pressure plate and release bearing was fitted.
The rear axle was likewise stripped and found to be perfect, so after checking the backlash it was re-assembled with new seals.
The complete drive train (engine, gearbox and rear end) were then finished and ready to be installed back in the chassis once the bodywork and paint have been finalised.
Painting:
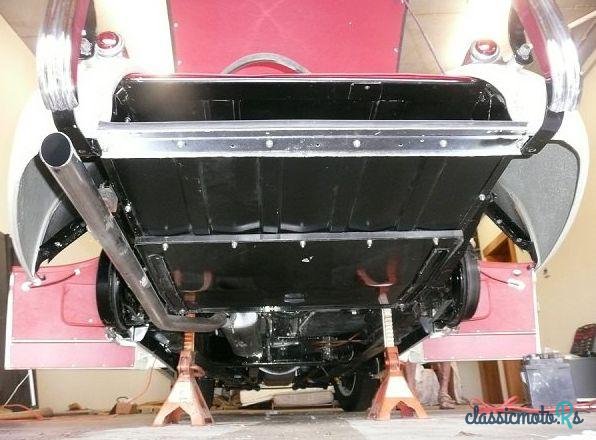
While the body was off the chassis it was turned upside down and the underneath and inside of all the panels were etch primed, sanded and painted. This was also done to the insides of the rear guards and spats before they were refitted to the body.
Once the chassis had been fully restored the body was re-installed onto it and exterior painting commenced.
All the aluminium was cleaned off and immediately given a coat of etch primer. It was then wet sanded and several more coats of primer were applied and sanded.
It is important to note here that not a single ounce of body filler was used at any stage. The body had been finished with the old fashioned “hammer and file” method and there was no need to use filler to disguise poor workmanship.
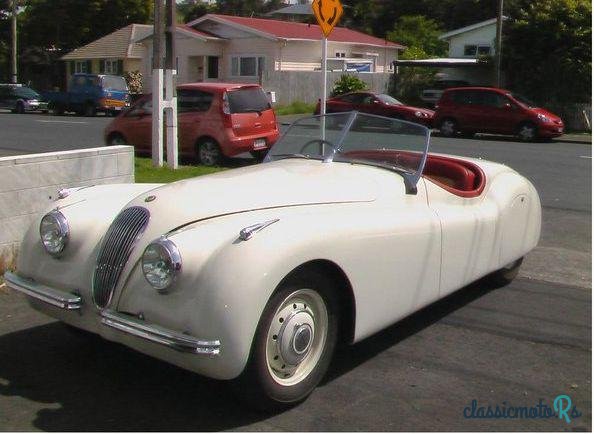
The colour Old English White was chosen as being in keeping with the style and period of the car.
In total it was estimated that over thirty coats of primer and colour were applied to the car, giving it a deep and lasting lustre that will last for another sixty years or more.
Exterior Trim:
All the original chrome fittings came with the car, so no modern inferior quality reproduction parts were used.
All the bright work was re-chromed using the traditional “triple plating” technique (layers of copper, nickel and chrome).
The original windscreen side pillars and chrome surrounds were re-plated. The original rubber mounting pads were deteriorated and no new parts were available (the Alloy cars had unique rubber mounts which are not interchangeable with the later steel bodied cars). So a mould was made using the original parts as templates and new rubbers were cast, which were then hand finished.
The headlamps are the correct type with the “tripod” lenses. These are NOS parts (New Old Stock) which are about sixty years old and have never used, being purchased through Club members and still in their original packaging.
One outstanding feature of 660046 is that the original grille came with the car and was in very good condition. This is the very early type that is unique to the Alloy cars, with a raised ridge, or flute, on the leading edge of each rib. The grille was restored by carefully removing each rib and then re-assembled to perfectly fit the bonnet aperture. The completed grille was then sent to be triple chrome plated to match all the other external chrome trim.
Road Wheels:
The original wheels were fitted to the car and are were in excellent condition. They were media blasted and painted in Old English White to match the car. The original hub caps were likewise with the car and were re-chromed and re-painted to match the body colour, with new “Jaguar” badges in the centre
The original tyres were obviously unusable so a set of five original-style cross ply tyres of the correct size were imported from Coker tyres in the USA.
Final Assembly:
A month of curing time was allowed for the paint to completely settle before final assembly took place.
The front and rear suspension and rear axle were media-blasted and painted in black with two pack paint. They were then re-installed using all new bushings, which were sourced through the Daimler Club of New Zealand.
The steering box was dismantled, cleaned and checked and found to be within factory tolerances, so it was re-assembled with new seals and installed in the chassis.
The brakes had been completely overhauled by Bryson’s, but for safety reasons the master and slave cylinders were stripped, cleaned and reassembled with new rubber seals. The brake drums were skimmed and new brake linings installed. A new handbrake cable was also installed. All the old hydraulic brake lines were discarded and new ones fabricated.
The completed engine, clutch and gearbox assembly was then installed in the car, using new rubber mounts and universal joints.
The exterior trim and chrome was then fitted, using a new wiring loom sourced from the UK
At that stage the car was driveable, although without any interior, so a temporary driver’s seat was installed and the car was driven for about fifty miles check everything was working properly. Only minor adjustments were required, then the engine oil and filter were changed.
The car was then sent to a specialist motor trimmer to have the interior installed.
Interior Trim:
The interior has been completely restored to the original factory specifications, including the use of four complete hides of Connelly leather.
The seat frames have been chrome plated as original and the seats themselves have been re-upholstered in red leather with tan inserts, just as the car came from the Jaguar factory in 1949.
The door panels have been re-covered in the correct red material, and all the door fittings have been re-chromed using the triple plating method.
About five yards of Wilton carpet were sourced by John Bray (the previous owner) and came with the car. This was used by the upholsterer to fabricate the carpets to the factory’s original specifications.
The original dashboard came with the car and was in perfect condition, so it was re-covered with Connelly leather. The instruments were fully restored and were re-installed.
The correct “Jabbeke” plate is available but has not been fastened to the dashboard, in accord with the current owner’s wishes.
The original soft top came with the car and was in excellent condition for its age, so it was used as a pattern for a new one. The rear window is the Jaguar original glass, as are the chrome surrounds, which were re-plated. This is a rare feature because many modern restoration of Alloy cars use incorrect clear plastic inserts for the rear window.
The soft top bows were also original and in excellent condition. The frame was dismantled and re-chromed, then re-assembled using stainless steel screws and nuts and bolts.
The side screens were also original and in very good condition, giving a perfect pattern for the new set that was constructed.
The cockpit has a rubber D-roll around the edge. A length of correct and original rubber “D” moulding was sourced by John Bray and was aged for several years to allow for shrinkage. Connelly leather was again used to cover the D-roll to match the seats and dashboard.
As a final touch, a car cover was specifically made to fit the car. This will accompany the vehicle to its new owner.
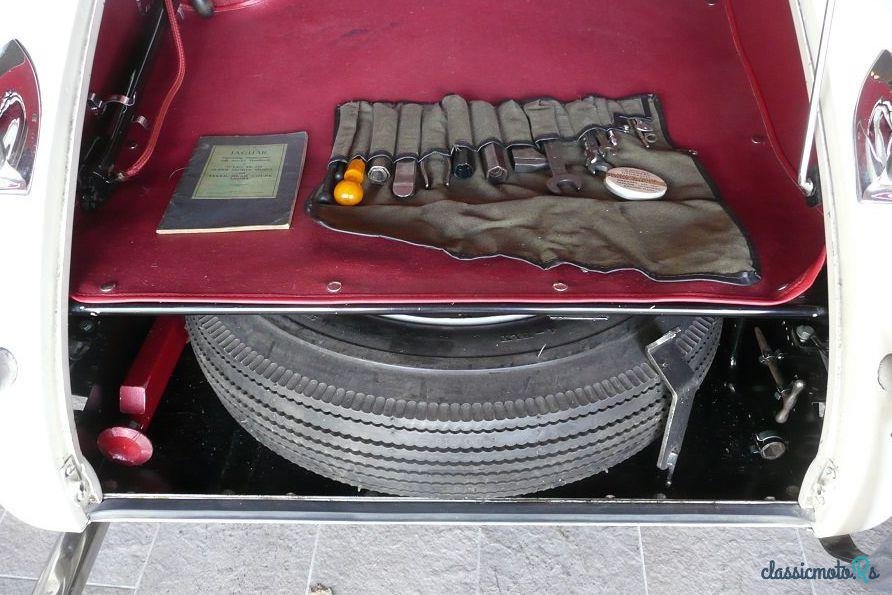
Tools and Accessories:
A comprehensive tool kit is supplied with the car. It is well known that the Alloy cars had variations in the exact specification of tools, which changed with availability at the time. So the tool kit is based on the specifications laid down in the book “Original Jaguar XK” by Phillip Porter, with acknowledgements to Roger Paine who was consulted by Porter for the specific details.
The tool roll contains the array of correct tools as described above. The correct model of the jack was completely different to all other XK models, the correct tyre pump, wheel brace and Telcamit Plastigun are also included.
Summary:
This is a very rare opportunity to acquire a well known and fully documented RHD Alloy bodied XK120, one of only 35 known survivors.
As detailed above, the restoration has being painstakingly completed to the highest possible standards, not just in the shiny appearance of the paint and chrome, but more importantly in the structural integrity of the car.
The restoration was completed in 2006 and the car has since been housed in a private residence in New Zealand.
It has been correctly maintained and has not been driven on the road. It is still in pristine condition, exactly as it was when the restoration was completed, a fitting tribute to the quality and talent of the restoration artisans.
Over View:
This document is written as a continuation of the file “XK120 Alloy History” and is to document the full restoration of 660046, commencing from the time of its original purchase by Barrie Angliss in 2001.
A file of historical documentation and receipts are available in digital form, together with a collection of photographs at various stages of the restoration.
All numbers are certified correct and matching by Jaguar Heritage (certificate available):
Chassis # 660046
Engine #: W 1133-7
Body #: F1153
Gearbox #: JH1180
Condition of the car as purchased:
During the restoration process initiated by Brylaw’s in the late 1970’s the bodywork was partly restored with portions of the woodwork, alloy and steel replaced and the car was painted dark blue. The original (and correct) engine and drive train were claimed to have been completely overhauled by Brylaw’s, as were the suspension, steering and brakes.
While in the ownership of John Bray (from about 1979 until 2001) very little was actually done to the car except for some detailed work. But important work had been accomplished in sourcing components that are now obsolete and almost impossible to find.
Barrie Angliss was advised of the existence of 660046 through the Jaguar Club of Canberra and he purchased the car from John Bray in 2001.
Barrie was a New Zealand importer of classic cars, was co-owner of the world famous coach building company Tempero Coach & Motor Co. Ltd, and later spent a number of years with RM Auctions in the USA.
At the time of purchase the chassis and body seemed to be in good condition and the car was substantially complete, but it was obvious that this would be a major restoration project.
Restoration Research:
660046 was then shipped to New Zealand for restoration. When it arrived in Auckland NZ, Angliss and the restoration team at Henderson Vintage Car Restoration spent some months researching the history and provenance of the car. The result convinced them that the car was worthy of a full frame off restoration to the highest possible standards.
They undertook a full inspection of the car, including careful measurements of each panel, checking for alignment, fit and overall integrity. The next step was to completely strip off all the old 1970’s paint to reveal what was underneath and to remove the engine and gearbox assembly for stripping and checking.
Body:
For the whole of its life the car had been in dry Australian near-desert conditions, similar to Arizona’s climate, and so had suffered virtually zero deterioration from rust or other corrosion. Much work had been done while in the ownership of Brylaws in the 1970’s - legend has it that they spent in the vicinity of A$40,000 on the car, which was a massive amount of money in the 70’s. The car is in fact quite famous in Australian circles and is known as the “Brylaw’s Black Hole”, referring to the amount of money that was poured into the car.
However, the company that started the restoration at that time were not working to modern standards and the quality of the bodywork and panels would not be accepted in current concours circles.
Accordingly, Henderson Vintage Car Restorations commenced a comprehensive rebuild, starting with the removal of all dubious woodwork and aluminium.
The tradesmen who worked on the car were among the highest skilled coach building artisans in the world. Using the old fashioned methods as employed by Jaguar when the car was originally built, they took fresh sheets of aluminium and used English wheeling machines, folders and welders to construct new panels wherever required.
As a starting point a complete new set of sills, hinge pillars and shut pillars were fabricated from wood and steel to give a perfect aperture for the doors and a guaranteed correct center section for the car to be built around. The windshield top tonneau panel was then checked and found to be out of alignment, so a new wood frame was constructed together with a new aluminium top panel. From there the coach builders moved on to the critical forward sections of the car.
The aluminium in the front guards was found to be very fatigued and thin and were impossible to work with. In addition the sides were somewhat bulbous instead of being completely flat. So in order to make a perfect job a complete new pair of front guards were fabricated, from the bulkhead to the bumpers, including the headlamp pods.
The bonnet was also inspected at this time and found to be in similar condition. So a complete new bonnet was fabricated, using the original as a template, including a new front section to perfectly house the car’s original double fluted grille.
The next stage was to remove the rear guards, tonneau panels and boot lid. The wooden frames were found to be badly deteriorated so a complete new set of frames were made using Jaguar’s original method of laminating several thin layers of wood to the correct curvature. New aluminium was then used to re-skin the tonneau panel and boot lid.
The rear guards and spats were in the same condition and so were discarded and a completely new set manufactured. Finally, a new pair of doors were made to perfectly fit the door apertures.
The end result can be seen from the photographs. The new owner can see a completely fresh and perfect body, built by skilled craftsmen, all in bare aluminium, without any sort of body filler being used before the commencement of painting.
Chassis:
The work on the body as listed above was accomplished while it was mounted on the chassis. Note that the construction of the alloy cars was quite different from that of the steel cars, where the body can be lifted off in one piece (with appropriate bracing). An alloy car has its body hand crafted and installed on the chassis frame in sections, each of which must be perfectly aligned on the chassis before progressing to the next stage. As such, each Alloy car was slightly different and panels are not interchangeable between cars.
Referring to the photographs of the restoration, the body can be seen complete and mounted on the chassis. At that stage the body was lifted off the chassis in sections and the chassis was laid bare.
All remaining components were then stripped off the chassis. This included the suspension, steering, brakes and all piping and wiring.
Upon inspection the chassis was found to be in excellent condition with no signs of rust or damage of any kind, as would be expected from a life in Australia’s dry desert climate. It had been painted in black by Brylaw’s during their 1970s restoration and this has faded but it had done its job in preserving the frame from deteriorating.
The bare chassis was sent to a specialist for media blasting, inside and out. Sand blasting was ruled out because of the potential abrasion of the steel, so the relatively new technique of blasting with ground walnut shells was employed. After cleaning the chassis was then immediately given a coat of etch primer.
On return to the restoration shop it was carefully inspected, any minor defects were rectified and it was repainted in gloss black two-pack paint. The inside of the chassis rails were liberally coated in “Fishoilene” a traditional rust preventative.
Engine & Mechanical Parts:
While the body and chassis were being restored, work was started on the mechanical side of the car.
The car was fitted with its original engine and it was correct and complete, including the original “stud-free” cylinder head, high-pot carburettors, inlet and exhaust manifolds, alloy cooling fan, and sump with its integral oil level sensor.
Brylaw’s had reconditioned the engine by reboring the block, fitting new pistons, grinding the crankshaft and fitting new bearings and so on.
However, this was done some 25 years ago and it was doubtful whether the engine would have retained its integrity over the years. Accordingly, the engine and gearbox were removed and sent to a leading Jaguar specialist for stripping and checking. This proved to be a good step because, although the bores and crankshaft were in perfect condition, there were definite signs of ageing, specifically the piston rings and timing chain adjusters losing their tension.
So the engine was brought back up to perfect standards, with the crankshaft polished, the bores honed, new piston rings, bearings, tensioners and so on fitted. The cylinder head was dismantled and checked, the valves re-ground and new springs fitted. The whole internal assembly and flywheel was then balanced and the engine re-assembled.
While this work was progressing, the carburettors, distributor and electrical components were all overhauled. The dashboard instruments were all restored by a specialist instrument maker.
All the alloy on the engine was cleaned and sent to a specialist polishing house and given a high level of polish. This included the carburettors, inlet manifold, cam covers, breather housing and so on.
The exhaust manifolds were sent to a specialist and were refinished with vitreous enamel to the highest standards, as was originally done by Jaguar. The end results can be seen from the photograph of the engine before re-installing in the chassis.
The gearbox was dismantled and found to be in excellent condition, so it was re-assembled with new bearings, synchro rings and seals. A new clutch friction and pressure plate and release bearing was fitted.
The rear axle was likewise stripped and found to be perfect, so after checking the backlash it was re-assembled with new seals.
The complete drive train (engine, gearbox and rear end) were then finished and ready to be installed back in the chassis once the bodywork and paint have been finalised.
Painting:
While the body was off the chassis it was turned upside down and the underneath and inside of all the panels were etch primed, sanded and painted. This was also done to the insides of the rear guards and spats before they were refitted to the body.
Once the chassis had been fully restored the body was re-installed onto it and exterior painting commenced.
All the aluminium was cleaned off and immediately given a coat of etch primer. It was then wet sanded and several more coats of primer were applied and sanded.
It is important to note here that not a single ounce of body filler was used at any stage. The body had been finished with the old fashioned “hammer and file” method and there was no need to use filler to disguise poor workmanship.
The colour Old English White was chosen as being in keeping with the style and period of the car.
In total it was estimated that over thirty coats of primer and colour were applied to the car, giving it a deep and lasting lustre that will last for another sixty years or more.
Exterior Trim:
All the original chrome fittings came with the car, so no modern inferior quality reproduction parts were used.
All the bright work was re-chromed using the traditional “triple plating” technique (layers of copper, nickel and chrome).
The original windscreen side pillars and chrome surrounds were re-plated. The original rubber mounting pads were deteriorated and no new parts were available (the Alloy cars had unique rubber mounts which are not interchangeable with the later steel bodied cars). So a mould was made using the original parts as templates and new rubbers were cast, which were then hand finished.
The headlamps are the correct type with the “tripod” lenses. These are NOS parts (New Old Stock) which are about sixty years old and have never used, being purchased through Club members and still in their original packaging.
One outstanding feature of 660046 is that the original grille came with the car and was in very good condition. This is the very early type that is unique to the Alloy cars, with a raised ridge, or flute, on the leading edge of each rib. The grille was restored by carefully removing each rib and then re-assembled to perfectly fit the bonnet aperture. The completed grille was then sent to be triple chrome plated to match all the other external chrome trim.
Road Wheels:
The original wheels were fitted to the car and are were in excellent condition. They were media blasted and painted in Old English White to match the car. The original hub caps were likewise with the car and were re-chromed and re-painted to match the body colour, with new “Jaguar” badges in the centre
The original tyres were obviously unusable so a set of five original-style cross ply tyres of the correct size were imported from Coker tyres in the USA.
Final Assembly:
A month of curing time was allowed for the paint to completely settle before final assembly took place.
The front and rear suspension and rear axle were media-blasted and painted in black with two pack paint. They were then re-installed using all new bushings, which were sourced through the Daimler Club of New Zealand.
The steering box was dismantled, cleaned and checked and found to be within factory tolerances, so it was re-assembled with new seals and installed in the chassis.
The brakes had been completely overhauled by Bryson’s, but for safety reasons the master and slave cylinders were stripped, cleaned and reassembled with new rubber seals. The brake drums were skimmed and new brake linings installed. A new handbrake cable was also installed. All the old hydraulic brake lines were discarded and new ones fabricated.
The completed engine, clutch and gearbox assembly was then installed in the car, using new rubber mounts and universal joints.
The exterior trim and chrome was then fitted, using a new wiring loom sourced from the UK
At that stage the car was driveable, although without any interior, so a temporary driver’s seat was installed and the car was driven for about fifty miles check everything was working properly. Only minor adjustments were required, then the engine oil and filter were changed.
The car was then sent to a specialist motor trimmer to have the interior installed.
Interior Trim:
The interior has been completely restored to the original factory specifications, including the use of four complete hides of Connelly leather.
The seat frames have been chrome plated as original and the seats themselves have been re-upholstered in red leather with tan inserts, just as the car came from the Jaguar factory in 1949.
The door panels have been re-covered in the correct red material, and all the door fittings have been re-chromed using the triple plating method.
About five yards of Wilton carpet were sourced by John Bray (the previous owner) and came with the car. This was used by the upholsterer to fabricate the carpets to the factory’s original specifications.
The original dashboard came with the car and was in perfect condition, so it was re-covered with Connelly leather. The instruments were fully restored and were re-installed.
The correct “Jabbeke” plate is available but has not been fastened to the dashboard, in accord with the current owner’s wishes.
The original soft top came with the car and was in excellent condition for its age, so it was used as a pattern for a new one. The rear window is the Jaguar original glass, as are the chrome surrounds, which were re-plated. This is a rare feature because many modern restoration of Alloy cars use incorrect clear plastic inserts for the rear window.
The soft top bows were also original and in excellent condition. The frame was dismantled and re-chromed, then re-assembled using stainless steel screws and nuts and bolts.
The side screens were also original and in very good condition, giving a perfect pattern for the new set that was constructed.
The cockpit has a rubber D-roll around the edge. A length of correct and original rubber “D” moulding was sourced by John Bray and was aged for several years to allow for shrinkage. Connelly leather was again used to cover the D-roll to match the seats and dashboard.
As a final touch, a car cover was specifically made to fit the car. This will accompany the vehicle to its new owner.
Tools and Accessories:
A comprehensive tool kit is supplied with the car. It is well known that the Alloy cars had variations in the exact specification of tools, which changed with availability at the time. So the tool kit is based on the specifications laid down in the book “Original Jaguar XK” by Phillip Porter, with acknowledgements to Roger Paine who was consulted by Porter for the specific details.
The tool roll contains the array of correct tools as described above. The correct model of the jack was completely different to all other XK models, the correct tyre pump, wheel brace and Telcamit Plastigun are also included.
Summary:
This is a very rare opportunity to acquire a well known and fully documented RHD Alloy bodied XK120, one of only 35 known survivors.
As detailed above, the restoration has being painstakingly completed to the highest possible standards, not just in the shiny appearance of the paint and chrome, but more importantly in the structural integrity of the car.
The restoration was completed in 2006 and the car has since been housed in a private residence in New Zealand.
It has been correctly maintained and has not been driven on the road. It is still in pristine condition, exactly as it was when the restoration was completed, a fitting tribute to the quality and talent of the restoration artisans.